In this tutorial, you will learn Python commands to install and run Jupyter Python Notebook in Windows/Linux/macOS using the pip tool.
If you are using MacBook, refer exclusive tutorial about installing Jupyter on macOS. For Windows and Linux, continue reading this tutorial.
Jupyter is an open-source project which provides an interactive platform for executing programming code. It allows you to add a comment and make it more explanatory.
If you want to install Jupyter for Python, Jupyter is available as a Python module for Python versions 2 and 3. It is easy to install it using the pip tool.
Table of Contents
Pip is the default package management system or tool for installing/uninstalling and managing different packages in Python. It provides an OS-independent system, so you can use it for any of the operating systems like Windows, Linux (Ubuntu), macOS, etc…
You can install the Jupyter Notebook from the Python standard library with simple commands.
py -m pip install --upgrade pip
py -m pip install jupyter
Here, the first command is to upgrade the pip. It is always good practice to upgrade pip before installing any Python module.
Note: Managing the Python module is crucial for Python developers. Learn more about managing Python packages using Pip.
Running Notebook Jupyter
Once you installed it, run the following command to run the notebook.
py -m notebook
python3 -m pip3 install --upgrade pip
python3 -m pip3 install jupyter
Remember, pip is a package manager tool by default comes with Python binaries. The older Python 3 version has the tool pip3. So you have to use pip3 instead of pip.
Running Jupyter Notebook
python3 -m notebook
python -m pip install --upgrade pip
python -m pip install jupyter
Commands for installing Python packages for Python 2 versions are pretty straightforward.
Running Jupyter Notebook
python -m notebook
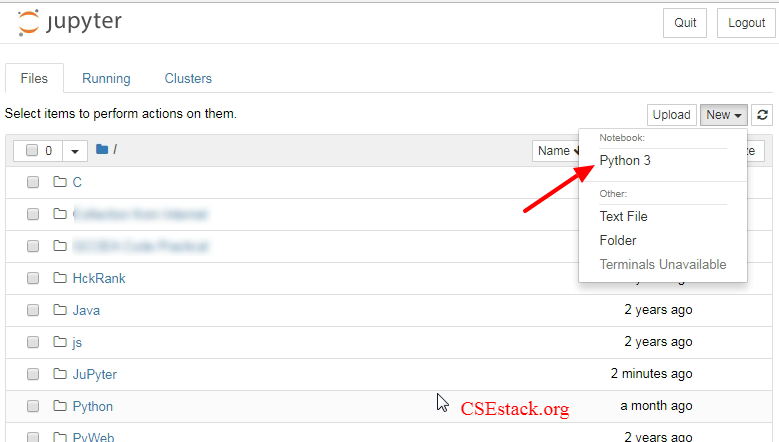
Jupyter creates the localhost server to execute the Python programs. Running the Jupyter notebook command will open the notebook page in the new tab of the browser as localhost.
You can see the local directories in your browser notebook.
Follow the steps for Writing Your First Python Program in Notebook:
You can rename the Jupyter file by double-clicking on it. I have renamed it to testProg.
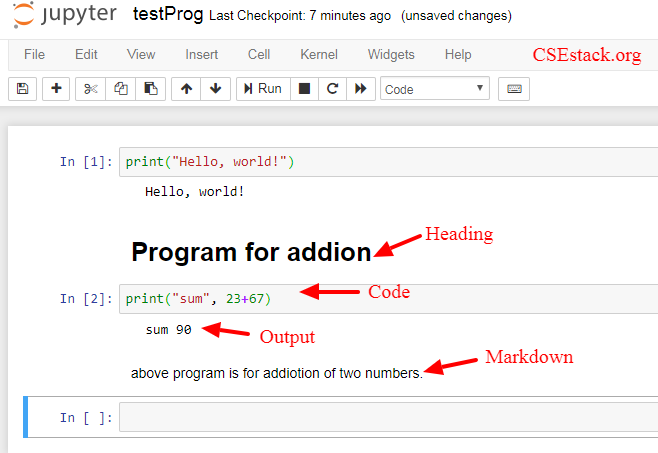
In the above Image, you can see the different cells where you can split your code.
It’s pretty easy to execute a Python program, isn’t it? You don’t need to execute any command line code. Just click on Run, and you have done with your Job.
Let’s find little more about using different types of cells in Jupyter.
There are majorly three types of cells in Jupyter.
Code:
This cell is to write and execute actual Python code.
Markdown:
This advanced feature comes with Jupyter where you can write simple HTML commands to decorate the text inside the browser.
Heading:
As its name, with this cell, you can add a heading to your Python Jupyter program. If your program has a large number of lines and cells, it is good practice to add headings. It is easy for understanding and maintaining Python code.
Note:
Jupyter notebook is deprecated and it is being replaced with JupyterLab which is nothing but the next-generation version of Jupyter notebook. JupyterLab comes with some more advanced features than Jupyter.
That’s all from this tutorial to install and run Jupyter Python Notebook.
Once you start using it, you will just love it. Running Python programs in Jupyter is pretty easy in the browser as compared to running Python code in different text editors. You don’t need to run a command every time to execute the code.
This tool is the best to explore data science libraries and projects.
If you are writing or practicing coding, adding explanatory comments for your code will help. Many Python tutors use Jupyter in their classrooms to teach Python and other programming languages. Even I am using Jupyter in my Data Science course.
This article covered all the detail required to execute your Python code in the Jupyter notebook. For more detail, you can visit Jupyter’s Official website.
What’s your experience or the best thing you like about Jupyter?
Shout out in the comment.

I am a Python enthusiast who loves Linux and Vim. I hold a Master of Computer Science degree from NIT Trichy and have 10 years of experience in the IT industry, focusing on the Software Development Lifecycle from Requirements Gathering, Design, Development to Deployment. I have worked at IBM, Ericsson, and NetApp, and I share my knowledge on CSEstack.org.
Jupyter notebook is best for Data Science. I’m a web developer and started learning data science.
That’s Great!
Aniruddha, I started learning Data Science. We have been asked to use Jupyter Notebook by our mentor. I’m just loving it. It is very simple and easy to use.
You’re right, Besty! For Data Science, Notebook is very powerful and quick. I’m sure, you will love it even more as you explore it further.
Thanks. What other tools do you use a lot in Data Science?
It depends on the requirement mostly. If you are interested to explore, you can have a look at these Data Science tools.