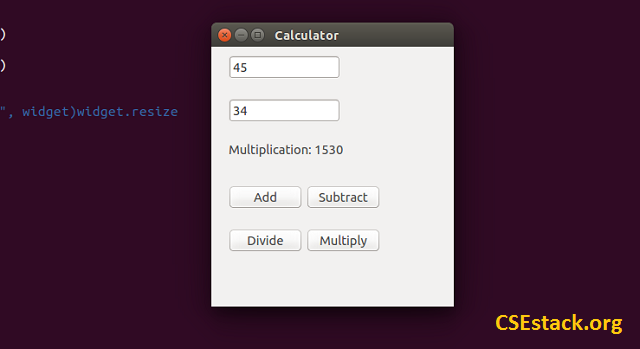
![[Complete Code] GUI Calculator in Python using PyQT4](https://www.csestack.org/wp-content/uploads/2017/07/GUI-Calculator-in-Python-output.png)
In this tutorial, I am sharing code to create a simple basic calculator to add, subtract, divide and multiply two numbers. GUI calculator in Python takes the two numbers as inputs from the user, performs the arithmetic operation, and displays the result on Graphical User Interface (GUI).
In an earlier article, I shared a Python complete basic tutorial for beginners. That article is featured with the simple command line code by which you can add, subtract, divide, and multiply two numbers using commands.
This is like a command line calculator in Python. But…
The intention of the tutorial is not only to make the Calculator but also to understand how GUI objects are created in Python.
At the end of this tutorial, I will share the complete code for the Python calculator. You can copy-paste and use it.
If you intend to learn Python, just don’t copy the code. Follow this article step by step, you can write your code. Trust me you will learn something amazing.
So let’s start.
For creating GUI, we are using PyQt4.QtGui package. It provides inbuilt functionality to create GUI objects like text area, buttons, labels…
If you don’t have PyQt4.QtGui package installed on your system, you can download and install it with this simple command.
sudo apt-get install python-qt4
Let’s start by considering the requirement to create a calculator…
For our code to make the calculator, we need…
Code for Creating Text Field for User Input
txtArea1 = QLineEdit("", widget)
txtArea2 = QLineEdit("", widget)
Code for Creating Clickable GUI Buttons
btnAdd = QPushButton("Add", widget)
btnSub = QPushButton("Subtract", widget)
btnDiv = QPushButton("Divide", widget)
btnMul = QPushButton("Multiply", widget)
Python Code for Plotting GUI objects in Widget
There is one widget, inside which we are displaying all the GUI objects.
To display the objects in the widget, we have to position them using…
All the GUI objects will be configured inside the init() function. It is the first function to be called.
Based on the button user clicks on, it will call the respective function.
For example, if the user clicks on the multiplication button, it calls multiplication() function. It reads the value from two text fields and performs the multiplication operation.
Reading User Input Values from Text Field:
The value in the input text field is in the text format and you need to convert it into an integer before performing arithmetic operations.
This is a simple line of Python code we are using to convert text to an integer.
num1 = int(txtArea1.text())
num2 = int(txtArea2.text())
Performing Arithmetic Operation Based on User Input:
Performing the arithmetic operation on user input num1 and num2 is pretty easy.
Write a dedicated function for each of the arithmetic operations. These functions return the output to the caller.
Display Python Calculator Result:
Assign the output to the label object using label.setText().
label.setText("Output: "+str(num1 * num2))
That’s it. If you take the other programming languages, it is not so easy to create a GUI, but Python does it with ease.
Now here it is you are looking for…
Simply copy and save it in a Python file. Run it.
import sys
from PyQt4.QtGui import *
#from PyQt4 import QtGui

app = QApplication(sys.argv)
widget = QWidget()
label = QLabel("", widget)

btnAdd = QPushButton("Add", widget)
btnSub = QPushButton("Subtract", widget)
btnDiv = QPushButton("Divide", widget)
btnMul = QPushButton("Multiply", widget)

#txtArea = QPlainTextEdit("Text To Edit", widget)widget.resize

txtArea1 = QLineEdit("", widget)
txtArea2 = QLineEdit("", widget)

def init():
    widget.resize(300, 300)
    widget.move(300, 300)
    widget.setWindowTitle('Calculator')
    widget.show()

    txtArea1.move(20,10)
    txtArea1.show()
    txtArea2.move(20,60)
    txtArea2.show()

    label.setText("")
    label.move(20,110)
    label.show()

    btnAdd.setToolTip('Addition')
    btnAdd.move(20,160)
    btnAdd.clicked.connect(addition)
    btnAdd.show()

    btnSub.setToolTip('Subtraction')
    btnSub.move(110,160)
    btnSub.clicked.connect(subtraction)
    btnSub.show()

    btnDiv.setToolTip('Division')
    btnDiv.move(20,210)
    btnDiv.clicked.connect(division)
    btnDiv.show()

    btnMul.setToolTip('Multiplication')
    btnMul.move(110,210)
    btnMul.clicked.connect(multiplication)
    btnMul.show()

def addition():
    num1 = int(txtArea1.text())
    num2 = int(txtArea2.text())
    label.setFixedWidth(200)
    label.setText("Addition: "+str(num1 + num2))

def subtraction():
    num1 = int(txtArea1.text())
    num2 = int(txtArea2.text())
    label.setFixedWidth(200)
    label.setText("Subtraction: "+str(num1 - num2))

def multiplication():
    num1 = int(txtArea1.text())
    num2 = int(txtArea2.text())
    label.setFixedWidth(200)
    label.setText("Multiplication: "+str(num1 * num2))

def division():
    num1 = int(txtArea1.text())
    num2 = int(txtArea2.text())
    label.setFixedWidth(200)
    label.setText("Division: "+str(num1 / num2))

if __name__ == "__main__":
     init()

app.exec_()
You can modify the field in the code to understand and enhance the GUI for the calculator.
You can enhance this calculator in various ways…
If you want to be an expert in Python, do read our Python tutorial which is available FREE for all.
Now, this is all for you. Get your hands dirty with code and show your skill. If you have any questions related to GUI Calculator in Python, write in a comment.
Happy Pythoning!

I am a Python enthusiast who loves Linux and Vim. I hold a Master of Computer Science degree from NIT Trichy and have 10 years of experience in the IT industry, focusing on the Software Development Lifecycle from Requirements Gathering, Design, Development to Deployment. I have worked at IBM, Ericsson, and NetApp, and I share my knowledge on CSEstack.org.
This is a nice tutorial on GUI and I love how you made it practical.
Thanks, Godson!
hi Aniruddha, i need a help in using tkinter text filed
Hi Akhila,
Please tell me, how can I help you?
Sir your tutorial is very explicit. my question is: it is not possible to use the mouse to drag n design those widgets (controls) on the form like what is obtainable in VB 6.0 and VB.net before one start coding in Python?
Am new in Python pls reply…
Best Regards.
Hi Omorsoe,
Personally, I have not tried using any tool for GUI. You can check this- https://github.com/alejandroautalan/pygubu. It is an Open source GitHub project.
There is one more http://page.sourceforge.net/. You can try.
You can simply use the QT designer tool for creating the graphical basement of your program.
for the next step you should convert your QT file (with name.ui format ) to python file (name.py) & then start writing codes for everything that needs.
Hi Aniruddha,
I had gone through the GUI Calculator tutorial Explanation is good
I tried to install it in Windows 10 in python 3.6.6
for that, I Installed “pip install PyQt5” module
then I am getting “NameError: name ‘QWidget’ is not defined” error
can you please check and give me the solution
Hi Anil,
Looks like you have installed PyQt5. The code in this tutorial is based on PyQt4. Either you can try installing PyQt4 or find suitable matching functions in PyQt5.
[python]import sys
from PyQt5.QtGui import *
from PyQt5.QtCore import *
from PyQt5.QtWidgets import *
# from PyQt4 import QtGui
app = QApplication(sys.argv)
widget = QWidget()
label = QLabel("", widget)
btnAdd = QPushButton("Add", widget)
btnSub = QPushButton("Subtract", widget)
btnDiv = QPushButton("Divide", widget)
btnMul = QPushButton("Multiply", widget)
# txtArea = QPlainTextEdit("Text To Edit", widget)widget.resize
txtArea1 = QLineEdit("", widget)
txtArea2 = QLineEdit("", widget)
def init():
widget.resize(300, 300)
widget.move(300, 300)
widget.setWindowTitle(‘Calculator’)
widget.show()
txtArea1.move(20, 10)
txtArea1.show()
txtArea2.move(20, 60)
txtArea2.show()
label.setText("")
label.move(20, 110)
label.show()
btnAdd.setToolTip(‘Addition’)
btnAdd.move(20, 160)
btnAdd.clicked.connect(addition)
btnAdd.show()
btnSub.setToolTip(‘Subtraction’)
btnSub.move(110, 160)
btnSub.clicked.connect(subtraction)
btnSub.show()
btnDiv.setToolTip(‘Division’)
btnDiv.move(20, 210)
btnDiv.clicked.connect(division)
btnDiv.show()
btnMul.setToolTip(‘Multiplication’)
btnMul.move(110, 210)
btnMul.clicked.connect(multiplication)
btnMul.show()
def addition():
num1 = int(txtArea1.text())
num2 = int(txtArea2.text())
label.setFixedWidth(200)
label.setText("Addition: " + str(num1 + num2))
def subtraction():
num1 = int(txtArea1.text())
num2 = int(txtArea2.text())
label.setFixedWidth(200)
label.setText("Subtraction: " + str(num1 – num2))
def multiplication():
num1 = int(txtArea1.text())
num2 = int(txtArea2.text())
label.setFixedWidth(200)
label.setText("Multiplication: " + str(num1 * num2))
def division():
num1 = int(txtArea1.text())
num2 = int(txtArea2.text())
label.setFixedWidth(200)
label.setText("Division: " + str(num1 / num2))
if __name__ == "__main__":
init()
app.exec_()[/python]
Thanks, Vishesht for sharing PyQt5 code.
Getting this error.
so imported in this way
import PyQt5
Now it is throwing me
Kindly, can you suggest me what to do?
I have used
pip install python-qt5I think you are using a Windows operating system.
Looks like
python3.dllis missing from your installed Python files. Check if it is there. If it is there and you are using virtual environment, copypython3.dllfile fromc:\python35(your installed Python directory) tovirtualenv\scripts\python3.dll.I have this python code for a GUI calculator but need someone who could tell me how to get lambda out of the program from Tkinter import *
[python]
def iCalc(source, side):
storeObj = Frame(source, borderwidth=4, bd=4, bg="powder blue")
storeObj.pack(side=side, expand =YES, fill =BOTH)
return storeObj
def button(source, side, text, command=None):
storeObj = Button(source, text=text, command=command)
storeObj.pack(side=side, expand = YES, fill=BOTH)
return storeObj
class app(Frame):
def __init__(self):
Frame.__init__(self)
self.option_add(‘*Font’, ‘arial 20 bold’)
self.pack(expand = YES, fill =BOTH)
self.master.title(‘Calculator’)
display = StringVar()
Entry(self, relief=RIDGE, textvariable=display,
justify=’right’
, bd=30, bg="powder blue").pack(side=TOP,
expand=YES, fill=BOTH)
for clearButton in (["C"]):
erase = iCalc(self, TOP)
for ichar in clearButton:
button(erase, LEFT, ichar, lambda
storeObj=display, q=ichar: storeObj.set(”))
for numButton in ("789/", "456*", "123-", "0.+"):
FunctionNum = iCalc(self, TOP)
for iEquals in numButton:
button(FunctionNum, LEFT, iEquals, lambda
storeObj=display, q=iEquals: storeObj
.set(storeObj.get() + q))
EqualButton = iCalc(self, TOP)
for iEquals in "=":
if iEquals == ‘=’:
btniEquals = button(EqualButton, LEFT, iEquals)
btniEquals.bind(”, lambda e,s=self,
storeObj=display: s.calc(storeObj), ‘+’)
else:
btniEquals = button(EqualButton, LEFT, iEquals,
lambda storeObj=display, s=’ %s ‘ % iEquals: storeObj.set
(storeObj.get() + s))
def calc(self, display):
try:
display.set(eval(display.get()))
except:
display.set("ERROR")
if __name__==’__main__’:
app().mainloop()
[/python]
Hi Lanz,
You can replace the lambda with a typical function. You read about the lambda function.
Can you give me an example of what one of the lambda codes would look if it was a typical function? I am a high school student taking a college class and this assignment was given to me in place of an assignment because my grandpa was in the hospital and all I just can’t seem to understand. Was doing good in the class until they did the stay at home order?
Sorry to hear that. You can check the lambda function here in detail. Kindly let me know if you have any doubt while going through it.
Can you give me a example of what one of the codes would look like. For some reason it is just not clicking with me
The program mentioned in this tutorial is a workable code. Kindly let me know if you find any specific difficulty.
Please excuse my ignorance but when I enter “sudo apt-get install python-qt4” in python shell, it returns an error. Did you specify how to acquire this package and I missed it?
Hi Justin, can you please mention what error message are you seeing after running the command?
Hello Aniruddha, how do I install pyQt5 on Windows 10, Any MOP on how it is done, please?
Here, pyQt5 is nothing but the Python library so it should be installed as we install any other Python libraries. Ex.
pip install pyqt5.