Do you want to host our own website online for FREE? You are at the right tutorial. I will explain to you how you can deploy your Django website on Pythonanywhere for FREE step-by-step.
You can host any Python web framework-based (Django, Flask, Bottle,…) applications on PythonAnywhere. And it is pretty easy.
GitHub is the source code hosting platform where you can host your project code. If you already have your project code hosted on GitHub, skip this step.
Create your GitHub account, if you don’t have one. Create a new repository on GitHub for your project and push your code.
Set your repository private if you don’t want to make it public. Otherwise, anyone can access your project source code.
If you are new to source code management and hosting, refer Git tutorial. This tutorial will explain you in detail.
First of all, create your account on PythonAnywhere.
Now we are setting up the Django environment to execute your code from GitHub. We are using the PythonAnyWhere tool for easy installation.
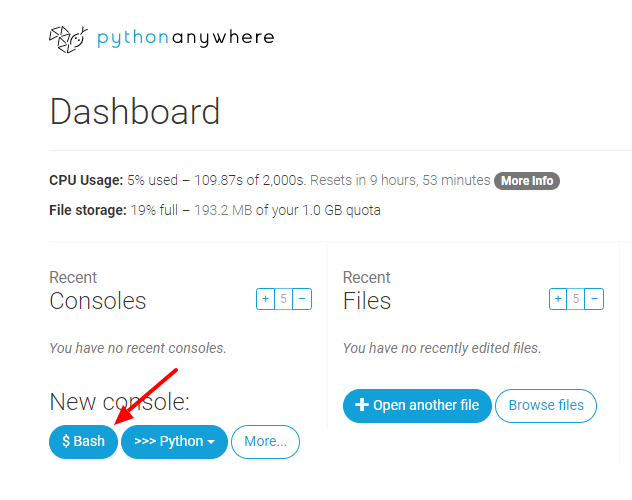
Once you create your account, open the dashboard and click on “Bash” under “New Console”.
Run below command. This command will install all the required Python site-packages to host your Django website.
pip3.8 install --user pythonanywhere
Now you have to clone your GitHub repo, install the required Python modules, and host the website. You don’t need to do it manually. Just run the below command and PythonAnyWhere will do all the things required, for you.
pa_autoconfigure_django.py --python=3.8 <github_repo_link>
You will be asked to provide the GitHub username and password. (Note: GitHub is started using the personal access token. You can use it as a password here.)
Following tasks will be executed by the above command to make your Python web app aka website online. (This will save you a lot of effort and time.)
/static/ and /media/ (The path for the static and media files are mentioned in the settings.py which you can modify.)WSGI file at /var/www/<app_name>_pythonanywhere_com_wsgi.pycollectstatic to copy all the static files to one static path for further use in the web app. (To understand the static files in Django, refer to this link.)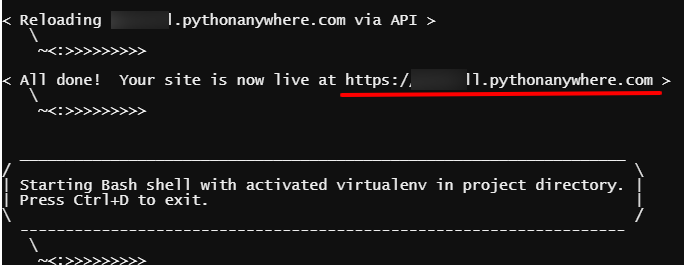
Open the website URL in the web browser. You will see your website running. 😀
If this above script fails for any error, use the “--nuke” option. (Note: option --nuke eliminates all the previous changes, delete web app and set it up fresh.)
In a free account, you have to use the PythonAnywhere URL to access your Django website. If you want to customize the URL to your own domain, you have to upgrade your account. You can start with a very basic plan which costs you $5/month.
The price is very affordable. Isn’t it?
Follow the steps given below.

BOOM 😀 Your website is LIVE.
Note: Sometimes, it takes time to update the DNS record. Be patient.
Creating your PythonAnywhere account, opening bash console, and running two commands. That’s all you have to do to make your website live on the internet. Isn’t it so simple?
The good thing about PythonAnywhere is that you will have full control of your server. You can take the backup of your Django website without any hassle.
After doing research and trying multiple hosting platforms, this is the PythonAnywhere is the simplest and most reliable platform. I’m using it to host more than 10 websites now. If you have any questions, you can ask me in the comment section below.

I am a Python enthusiast who loves Linux and Vim. I hold a Master of Computer Science degree from NIT Trichy and have 10 years of experience in the IT industry, focusing on the Software Development Lifecycle from Requirements Gathering, Design, Development to Deployment. I have worked at IBM, Ericsson, and NetApp, and I share my knowledge on CSEstack.org.