![[Step-by-Step] Create a Django SignUp Registration Form with Database](https://www.csestack.org/wp-content/uploads/2020/12/django-sign-up-registration-form-with-extended-fields.png)
In this tutorial, we are going to use the default Django User for creating our sign-up and registration form.
We are considering our project name as MyProject and app name as Core. If you are copying code from this tutorial, change the wording MyProject and Core with your project name and app name respectively.
Let’s start creating the registration form step-by-step with a simple example.
First of all, create a URL for your signup page by adding a new path to the urlpatterns list in urls.py.
from . import views
from django.conf.urls import url, include
from django.urls import path

urlpatterns = [
    url(r'^$', views.index, name='home'),
    path('signup/', views.signup, name='signup'), # newly added
]
We are going to use the Django forms to create the signup form.
If you are new to Django form, refer Django form tutorial.
Create forms.py file if it is not present and add the following class for the sign-up form.
For creating sign up form, we can use the Django UserCreationForm.
django.contrib.auth.models import User
from django.contrib.auth.forms import UserCreationForm

class SignUpForm(UserCreationForm):
    class Meta:
        model = User
        fields = ('username', 'password1', 'password2', )
Create a view to process the signup data and save that data into the database. You can simply copy below function definition in your views.py file.
from .forms import SignUpForm

def signup(request):
    if request.method == 'POST':
        form = SignUpForm(request.POST)
        if form.is_valid():
            user = form.save()
            user.refresh_from_db()
            # load the profile instance created by the signal
            user.save()
            raw_password = form.cleaned_data.get('password1')

            # login user after signing up
            user = authenticate(username=user.username, password=raw_password)
            login(request, user)

            # redirect user to home page
            return redirect('home')
    else:
        form = SignUpForm()
    return render(request, 'signup.html', {'form': form})
Create a sign-up HTML page in your template directory.
{% extends 'base.html' %}

<h2>Sign up</h2>
 <form method="post">
    {% csrf_token %}
    {% for field in form %}
      <p>
        {{ field.label_tag }}<br>
        {{ field }}
        {% if field.help_text %}
          <small style="color: grey">{{ field.help_text }}</small>
        {% endif %}
        {% for error in field.errors %}
          <p style="color: red">{{ error }}</p>
        {% endfor %}
      </p>
    {% endfor %}
    <button type="submit">Sign up</button>
  </form>

{% endblock %}
Run your Django project locally. Open the below URL in your browser.
http://127.0.0.1:8000/signup/
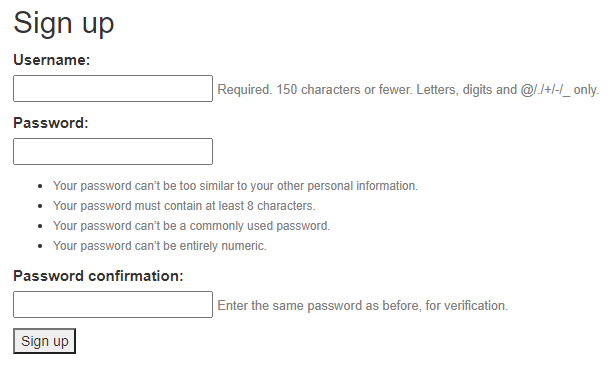
This is what the signup form will look like.
Wow!
This is simple, isn’t it?
You can add CSS code to customize the UI and to make it look nice.
We have just considered the username and password for the sign-up form. We might want to ask the user for more data for registration like a mobile number. In this case, you can add extended fields to your Django sign-up registration form.
Let’s see.
Update the Django form by adding a new field for the mobile number.
django.contrib.auth.models import User

class SignUpForm(UserCreationForm):
    mob = forms.IntegerField(max_length=11) # newly added
    class Meta:
        model = User
        fields = ('username', 'mob', 'password1', 'password2', )
        labels = {'mob': 'Mobile Number',} # newly added
If you run the Django project and open the Signup page, it will look like this.
Even though the mobile number field is visible on the registration form, there is no provision to store that field value.
Instead of saving this data in the default Django User model, we are creating a new Profile model where we will be saving all the other extended reaeration fields.
Creating a new model named Profile in models.py.
class Profile(models.Model):
    user = models.OneToOneField(User, on_delete=models.CASCADE)
    mob = models.IntegerField()
Note: Here, the field “user” is inherited from the Django “User” model using the relationship model field- OneToOneField. In this case, if the user gets deleted from the default Django User model, his/her profile data also will get deleted.
When the user submits the registration form, we have to save the data into the profile model.
Update the signup view in your views.py file.
from .forms import SignUpForm

#newly added function
def update_user_data(user):
    Profile.objects.update_or_create(user=user, defaults={'mob': user.profile.mob},)

def signup(request):
    if request.method == 'POST':
        form = SignUpForm(request.POST)
        if form.is_valid():
            user = form.save()
            user.refresh_from_db()

            #newly added
            user.profile.mob = form.cleaned_data.get('mob')
            update_user_data(user)

            # load the profile instance created by the signal
            user.save()
            raw_password = form.cleaned_data.get('password1')

            # login user after signing up
            user = authenticate(username=user.username, password=raw_password)
            login(request, user)

            # redirect user to home page
            return redirect('home')
    else:
        form = SignUpForm()
    return render(request, 'signup.html', {'form': form})
From the signup form, we are calling update_user_data, to save the extended user profile information.
You can see all the registered users in the Django database through the admin dashboard. For that, you have to add model “Profile” in the Django admin.
You can also provide a feature in your registration form to allow users to sign up with Social media like Facebook, Gmail, LinkedIn, Twitter, etc.
Congratulations! Your registration form is ready.
That’s all from the Django signup registration form.
If you get any difficulties while creating the registration form, ask me in the comment section below. I’m happy to help you. Keep learning!

I am a Python enthusiast who loves Linux and Vim. I hold a Master of Computer Science degree from NIT Trichy and have 10 years of experience in the IT industry, focusing on the Software Development Lifecycle from Requirements Gathering, Design, Development to Deployment. I have worked at IBM, Ericsson, and NetApp, and I share my knowledge on CSEstack.org.
Hello,
I am working on a project called Voice Based Email System.
And I need some answers.
The first one is that how we fill the form input field using voice means when I speak something form field to fill with it.
And my next question is How to Post data into a database with voice command means when I say post HTML button automatically clicked.
Appreciated any Help
Thanks
Hi Naaja, very interesting project.
You can display the buttons on your email form. Each button for recording subject, to, message. When the user clicks on the button that says the record message button, ask the user to speak and record the audio. Convert audio into text and save it.
You can also save recording audio as a multimedia file in Django
Best Wishes!
Hi bro thanks for sharing
Actually in my case newly added user isn’t saving to Users DB.
Kindly help if possible!
Its throwing this error!
django.contrib.auth.models.User.account.RelatedObjectDoesNotExist: User has no account.Hi Sag,
Looks like the account model is not updated in the backend. Your migration is not completely done.
Try running migration
– python manage.py makemigrations
– python manage.py migrate
Thanks for keeping it simple.
Hai, can you help me please?
Sure. Please post your query.
You have to add from
django.contrib.auth.models import Userin forms.pyThanks, Sana for notifying me. Corrected.
I finished this tutorial. I changed the line:
Profile.objects.update_or_create(user=user, defaults={'mob': user.profile.mob,)to
Profile.objects.update_or_create(user=user, defaults={'mob': user.profile.mob},)since it seems to have a typo. Everything seemed to run properly. I then went to your tutorial on
and everything seems to run properly, then I followed your tutorial “How to Add Model to Django Admin Site.” I now get an error after clicking the “sign up” button, “’User’ object has no attribute ‘profile’.” The error message refers me to the line: “user.profile.mob = form.cleaned_data.get(‘mob’),” in views.py.
I have been unable to determine why this isn’t working.
Thank you for your assistance.
Hi Lyli, thanks for notifying that typo. I have corrected that.
Regarding the error you are facing, there can be a couple of reasons. From the error, it looks like the table has not been created with the name “profile”. Hope you are following the proper database migrations steps. Check your database table through the Django admin dashboard.
Hi Aniruddha,
Nice article, but I have one question: where is “user.profile.mob” defined?
Thanks, Mahmood!
Here, “user.profile.mob” is the model field defined in the Profile model.
How can I add a text choice field to the form?
You can use the dropdown menu.