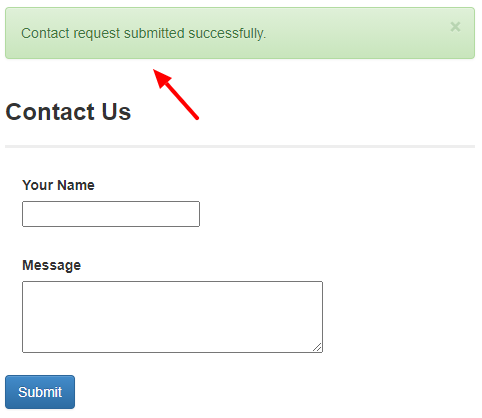
Do you want to show a confirmation message on submitting the form in your Django website?
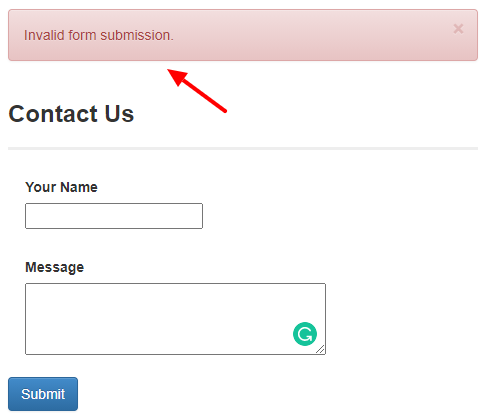
Let’s see if the user doesn’t provide correct information while filling the form. Do you want to show the error message as “Invalid form submission.”?
Show appropriate messages on the form submissions is very necessary.
Display messages after form submit in Django is not difficult as it seems to be. Here are the simple steps to implement a message framework for your Django website.
Add django.contrib.messages app entry in Django INSTALLED_APPS list in settings.py.
INSTALLED_APPS = [
    'django.contrib.admin',
    'django.contrib.auth',
    'django.contrib.contenttypes',
    'django.contrib.sessions',
    'django.contrib.messages',  #newly added
    'django.contrib.staticfiles',
    'main',
]
If you use the messages app without registering it in installed apps, you will get an error.
name 'messages' is not defined django.
This is the very first step.
There can be multiple forms in your web application. It is not a good practice to write the HTML template for each form.
What we are doing here is that we will write a separate HTML template and will include it in each form or wherever needed.
Here is the simple HTML template for submission.
{% if messages %}
  {% for message in messages %}
    <div class="alert alert-dismissible alert-success">
      <button type="button" class="close" data-dismiss="alert">
      ×
      </button>
      <strong>{{message}}</strong>
    </div>
 {% endfor %}
{% endif %}
Copy the above code and save this in the new template as messages.html in your template directory.
If you don’t have any Django form right now, let’s, create a simple HTML form with the POST method.
Include the messages.html. You can include it anywhere you want.
<div class="container">
    {% include 'messages.html' %}
    <form method="POST">
      <fieldset>
        <legend>Form</legend>
        {% csrf_token %}
        {{ form.as_p }}
        <button type="submit" class="btn btn-primary">
        Submit
        </button>
      </fieldset>
    </form>
</div>
In this case, I’m including it above the form. This will show the message at the top of the form after submission. If you want to display the message at the bottom of the form after submission, just include the messages.html at the bottom.
There are multiple message types that you can set like debug, info, success, error, and warning.
In this form submission, we are interested in setting up the success and error message.
If the form submission is valid and submitted successfully, show “Contact form submitted successfully.”
messages.success(request, 'Contact request submitted successfully.')
If the form submission is invalid, show “Invalid form submission.”
messages.error(request, 'Invalid form submission.')
You can also display the actual error so that the user can understand what has gone wrong.
messages.error(request, form.errors)
If you club these all changes, this is how a function in your views.py will look like for the contact form.
def contact_form(request):
    if request.method == "POST":
        form = ContactForm(request.POST)
        if form.is_valid():
            form.save()
            messages.success(request, 'Contact request submitted successfully.')
            return render(request, 'contact-form.html', {'form': ContactForm(request.GET)})
        else:
            messages.error(request, 'Invalid form submission.')
            messages.error(request, form.errors)
    else:
        form = ContactForm()
    return render(request, 'contact-form.html', {'form': form})
That’s all.
Start your Django server and Boom 😀 You are done!
Similarly, you can set the messages for Django registration and sign up. Show a logged-out message on successful logging out. Show sign-up message on successful sign-up.
You can enrich your message framework with Bootstrap. You can set the different colors and formats for each type of error message.
Here is the list of alert tags in bootstrap and their corresponding colors.
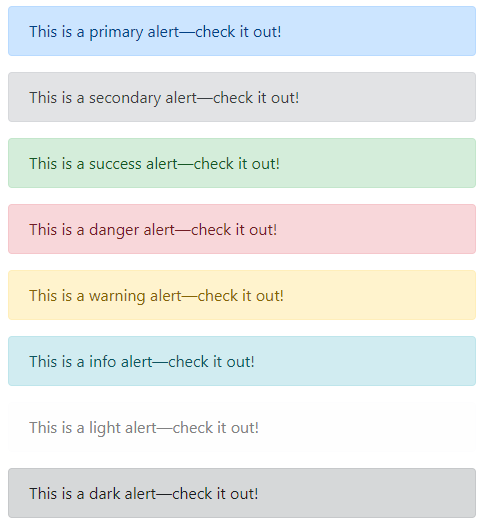
We can use these color formatting for different types of alert messages to show the different types of messages on the form submission. Let’s say, for valid submitting, use the success alert tag (the one with blue background), for error, use the danger alert tag (the one with red background).
You can set this mapping in settings.py. Set the message tags in the settings.py.
from django.contrib.messages import constants as messages
MESSAGE_TAGS = {
        messages.DEBUG: 'alert-secondary',
        messages.INFO: 'alert-info',
        messages.SUCCESS: 'alert-success',
        messages.WARNING: 'alert-warning',
        messages.ERROR: 'alert-danger',
}
Now you have to update your message template in messages.html.
{% for message in messages %}
<div class="container-fluid p-0">
  <div class="alert {{ message.tags }} alert-dismissible" role="alert" >
    <button type="button" class="close" data-dismiss="alert" aria-label="Close">
      <span aria-hidden="true">×</span>
    </button>
    {{ message }}
  </div>
</div>
{% endfor %}
Next, you can read all the entries submitted to your Django model/form.
This is how you can display messages after form submit in Django and Bootstrap. If you find any difficulty while setting messages Django form, let’s discuss it in the comment below.

I am a Python enthusiast who loves Linux and Vim. I hold a Master of Computer Science degree from NIT Trichy and have 10 years of experience in the IT industry, focusing on the Software Development Lifecycle from Requirements Gathering, Design, Development to Deployment. I have worked at IBM, Ericsson, and NetApp, and I share my knowledge on CSEstack.org.
Great stuff.
Thanks, Papan. I hope you enjoy going through the other tutorials as well.
Great work.
Thank you!
I like your simplicity in writing. Thanks.
I’m glad. Thanks, Raman!
Hi, thanks for the tutorial.
Just a small typo:
in the messages code you write
{{message}}– the second tag should be a closing tag.
Thanks for the correction, Christian. Fixed.
I am enjoying these your tutorials and how you present them. They are short, precise, and implementable. I would love to follow your other channels like Youtube and other languages pages if any. Thank you.
Thank you so much, Musa! Your feedback is truly motivating. You can also subscribe to our YouTube channel.
I’m Muhammad Jahangir from Pakistan. Aniruddha Chaudhari sir! Thank you so much for the Django tutorial. This is an amazing tutorial. Your way of explaining is outclass. Thank you again.
May Allah live you long! Ameen.
Thank you so much for your kind words. I’m glad you find this tutorial useful. Hope you enjoying going through other tutorials as well. God bless you!
“sender_name”: “Instagram User”,
“timestamp_ms”: 1688736106253,
“content”: “\u00d0\u009a\u00d0\u00be\u00d0\u00bd\u00d1\u0082\u00d0\u00b0\u00d0\u00ba\u00d1\u0082 \u00d1\u0081\u00d0\u00be\u00d0\u00b7\u00d0\u00b4\u00d0\u00b0\u00d0\u00bb \u00d0\u00b3\u00d1\u0080\u00d1\u0083\u00d0\u00bf\u00d0\u00bf\u00d1\u0083.”,
“is_geoblocked_for_viewer”: false,
“is_unsent_image_by_messenger_kid_parent”: false