In earlier tutorial, we have learned about creating Django form. It is easy to create the Django form.
Before you learn about how to render Django form layout using Widget Tweaks, let’s see why do you actually need it.
Below is the simple HTML template for creating login form.
<div class="container">
    <form method="POST">
      <fieldset>
        <legend>Form</legend>
        {% csrf_token %}
        {{ form.as_p }}
        <button type="submit" class="btn btn-primary">Submit</button>
      </fieldset>
    </form>
</div>
With a simple one liner tag form.as_p, you can render the complete form in the template.
This is how it looks like if you are creating login form.
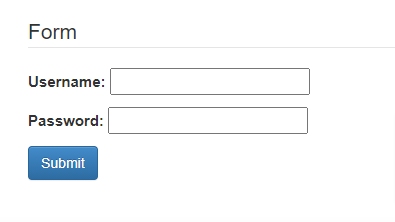
The form may look broken and not well-rendered for the user.
Sometimes, we also want to format and style each of the fields in the form separately.
For most of the project, I use bootstrap theme for formatting and styling.
Do you want to make use of bootstrap and add more styling to your form? You can render each field manually and add the bootstrap styling to it to give better look?
Let’s see how you can achieve that.
Step1: Install the Django Widget Tweaks Python module from PyPi using pip tool.
$ pip install django-widget-tweaks
You can learn more about pip tool to manage Python packages.
Step 2: Load widget tweaks tag library in your form template to use it.
{% load widget_tweaks %}
Note: If you use this tag without installing package, you will get error as …
Widget_tweaks is not a registered tag library
Step 3: Use render_field tag to set the bootstrap class for form field.
{% render_field form.username class="form-control" %}
In the above example, we are setting the “form-control” bootstrap class for username field.
This is how complete form looks like.
{% block bootstrap4_content %}
  <div class="container">
    {% load static %}
    {% load widget_tweaks %}
    <div class="col-lg-8">
      <h3>Form</h3>
        <hr>
        <form method="post">
          <fieldset>
            {% csrf_token %}
            <div class="form-group">
              <label>{{ form.username.label }}</label>
              {% render_field form.username class="form-control" %}
            </div>
            <div class="form-group">
              <label>{{ form.password.label }}</label>
              {% render_field form.password class="form-control" %}
            </div>
            <button type="submit" class="btn btn-primary"> Submit </button>
          </fieldset>
        </form>
      </div>
  </div>
{% endblock %}
When you execute your Django project, this is how the form looks like.
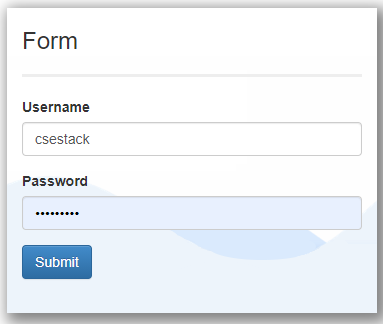
It looks more awesome now, isn’t it?
Personally, I find this Django Widget Tweaks package very useful to use along with the bootstrap. Even if you are not using bootstrap and want to set the class for the Django form field, this package is all you need.
Hope you find this tutorial to render Django form layout using Widget Tweaks useful. If you have any doubts or questions to ask me, write in the comment.

I am a Python enthusiast who loves Linux and Vim. I hold a Master of Computer Science degree from NIT Trichy and have 10 years of experience in the IT industry, focusing on the Software Development Lifecycle from Requirements Gathering, Design, Development to Deployment. I have worked at IBM, Ericsson, and NetApp, and I share my knowledge on CSEstack.org.