In this tutorial, you are going to learn how to create a Django social login with a Facebook feature for your Django project.
A social login feature can be a good add-on for many types of projects. With a simple social login, you can create a membership website, user profile, track user behavior, and whatnot…
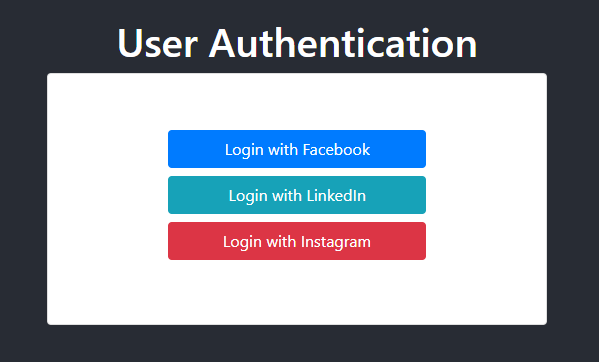
At the end of this tutorial, you will be able to develop a User authentication Django project as below.
As you are reading this tutorial, either you are learning to add social login features in Django or you are working on your project where you want to add social login features.
If you are learning, let’s start from scratch and follow this tutorial until the end. If you are interested in learning, just don’t read. Open your favorite editor or IDE and start developing along with me.
If you already have a Django project where you want to add a social login feature, skip step 1. And start from step 2.
Let’s begin.
How to implement Django social login with Facebook feature?
Table of Contents
As I said earlier, if you already have a project setup, skip this step.
$ python -m venv env
I’m not talking about the virtual environment in detail as it is not part of this tutorial. If you are new to the virtual environment, you can read the virtual environment in Python to get a better insight.
For Windows users, open the command prompt and run the below command.
$ cd env
$ .\Scripts\Activate
For Linux users, open the terminal and run the below command.
$ cd env
$ ./Scripts/Activate
Your virtual environment is up and running.
$ pip install django
It will install the latest Django Python module.
After installation, you can check all the install libraries using pip command.
$ pip freeze
You can see the Django project is installed.
asgiref==3.2.7
Django==3.0.5
pytz==2019.3
sqlparse==0.3.1
$ django-admin startproject my_project
$ cd my_project
You can see a new folder is created with the project name.
$ python manage.py startapp prime
Update settings.py to add a new app in your project setting.
Add a new app to the INSTALLED_APPS list.
INSTALLED_APPS = [
'django.contrib.admin',
'django.contrib.auth',
'django.contrib.contenttypes',
'django.contrib.sessions',
'django.contrib.messages',
'django.contrib.staticfiles',
'prime',  #newly added
]
python manage.py runserver
If you don’t see any error, your Django server is up and running.
Open the browser and run the localhost URL.
http://localhost:8000/
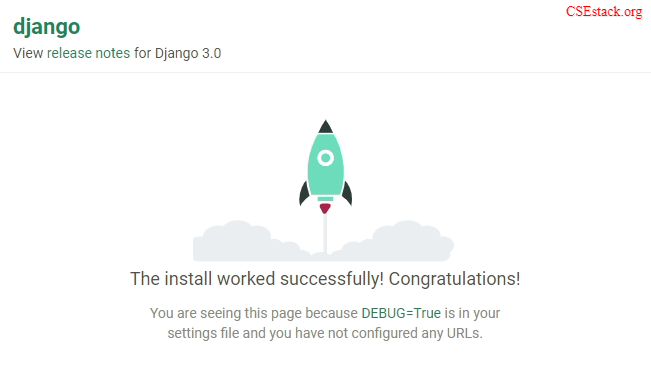
Congratulation!
You have installed Django successfully. Your project is up and running.
This step is well explained in the Django project tutorial for beginners.
In this Django social login with Facebook tutorial, we are using the social-auth-app-django Python module for social authentication.
This Python library has already defined all the required functionality for social login. You don’t need to write the functionality from scratch.
$ pip install social-auth-app-django
If you use pip freeze command it will list all the installed modules where you can see the social-auth-app-django installed on your system. It also installs other dependent modules.
$ pip freeze

asgiref==3.2.7
certifi==2020.4.5.1
cffi==1.14.0
chardet==3.0.4
cryptography==2.9
defusedxml==0.6.0
Django==3.0.5
idna==2.9
oauthlib==3.1.0
pycparser==2.20
PyJWT==1.7.1
python3-openid==3.1.0
pytz==2019.3
requests==2.23.0
requests-oauthlib==1.3.0
six==1.14.0
social-auth-app-django==3.1.0
social-auth-core==3.3.3
sqlparse==0.3.1
urllib3==1.25.8
It also installs Django if it is not installed earlier as a dependency.
Update the INSTALLED_APP in the settings.py to register the library in your project:
INSTALLED_APPS = [
'django.contrib.admin',
'django.contrib.auth',
'django.contrib.contenttypes',
'django.contrib.sessions',
'django.contrib.messages',
'django.contrib.staticfiles',
'prime',
'social_django', #newly added
]
py manage.py migrate
When you run this command, you can see all the performed operations on the database.
py manage.py migrate
Operations to perform:
Apply all migrations: admin, auth, contenttypes, sessions
Running migrations:
Applying contenttypes.0001_initial… OK
Applying auth.0001_initial… OK
Applying admin.0001_initial… OK
Applying admin.0002_logentry_remove_auto_add… OK
Applying admin.0003_logentry_add_action_flag_choices… OK
Applying contenttypes.0002_remove_content_type_name… OK
Applying auth.0002_alter_permission_name_max_length… OK
Applying auth.0003_alter_user_email_max_length… OK
Applying auth.0004_alter_user_username_opts… OK
Applying auth.0005_alter_user_last_login_null… OK
Applying auth.0006_require_contenttypes_0002… OK
Applying auth.0007_alter_validators_add_error_messages… OK
Applying auth.0008_alter_user_username_max_length… OK
Applying auth.0009_alter_user_last_name_max_length… OK
Applying auth.0010_alter_group_name_max_length… OK
Applying auth.0011_update_proxy_permissions… OK
Applying sessions.0001_initial… OK
There can be multiple authentications for the user. Users can login app through different social media applications like Facebook, LinkedIn or Twitter.
You can order these authentication methods. If the first authentication method fails, Django tries the second one, and so on.
By default, there is a single authentication method as
['django.contrib.auth.backends.ModelBackend']
You can check this setting inside settings.py.
Add new authentication methods with your preference order in setting.py.
AUTHENTICATION_BACKENDS = [
  'social_core.backends.facebook.FacebookOAuth2'
  'social_core.backends.linkedin.LinkedinOAuth2',
  'social_core.backends.instagram.InstagramOAuth2,
  'django.contrib.auth.backends.ModelBackend',
]
In the above setting, the order of authentication is Facebook, LinkedIn, Instagram and then Django basic authentication.
$ cd prime/
$ mkdir templates/
We require three files.
Create these three files and save them in the folder “templates”.
You also need a style sheet to organize and style content in the HTML files.
Create index.css file inside prime/static/css folder.
Open base.html and copy the below HTML code in the file.
<!-- templates/base.html -->

    {% load static %}
    <!DOCTYPE html>
    <html lang="en">
    <head>
        <meta charset="UTF-8" />
        <meta name="viewport" content="width=device-width, initial-scale=1.0" />
        <meta http-equiv="X-UA-Compatible" content="ie=edge" />
        <link rel="stylesheet" href="https://stackpath.bootstrapcdn.com/bootstrap/4.1.3/css/bootstrap.min.css" integrity="sha384-MCw98/SFnGE8fJT3GXwEOngsV7Zt27NXFoaoApmYm81iuXoPkFOJwJ8ERdknLPMO"
            crossorigin="anonymous" />
        <link rel="stylesheet" href="{% static 'css/index.css' %}" />
        <title>Social Auth with Django</title>
    </head>
    <body>
        <div class="container-fluid">
            <div>
                <h1 class="text-white text-center">{% block title %}{% endblock %}</h1>
                <div class="card p-5">
                    {% block content %}
                    {% endblock %}
                </div>
            </div>
        </div>
    </body>
    </html>
This is simple HTML code.
Open home.html and copy below HTML code into the files.
<!-- templates/home.html -->

{% extends 'base.html' %}
{% block title %} Home {% endblock %}
{% block content %}
<div class="row">
    <div class="col-sm-12 mb-3">
        <h4 class="text-center"> Welcome {{ user.username }} </h4>
    </div>
 </div>
{% endblock %}
Similarly, copy below HTML code for login.html.
<!-- templates/login.html -->

{% extends 'base.html' %}
{% block title %} User Authentication {% endblock %}
{% block content %}
<div class="row">
    <div class="col-md-8 mx-auto social-container my-2 order-md-1">
        <button class="btn btn-primary mb-2">
            <a href="#">Login with Facebook</a>
        </button>
        <button class="btn btn-info mb-2">
                <a href="#">Login with LinkedIn</a>
        </button>
        <button class="btn btn-danger  mb-2">
            <a href="#">Login with Instagram</a>
        </button>
    </div>
</div>
{% endblock %}
You need to add CSS code to style HTML tags. Add the below code to index.css.
/_ index.css _/

img {
  border: 3px solid #282c34;
}
.container-fluid {
  height: 100vh;
  background-color: #282c34;
  display: flex;
  justify-content: center;
  align-items: center;
}
.container-fluid > div {
  width: 85%;
  min-width: 300px;
  max-width: 500px;
}
.card {
  width: 100%;
}
.social-container {
  display: flex;
  flex-direction: column;
  justify-content: center;
}
.btn a, .btn a:hover {
  color: white;
  text-decoration: none ;
}
Keep this style sheet as it is right now. Later you can change it as you want.
Open prime/views.py and copy-paste the below code into the file.
from django.shortcuts import render
from django.contrib.auth.decorators import login_required

def login(request):
	return render(request, 'login.html')

@login_required
def home(request):
	return render(request, 'home.html')
We have to set the URL so that when the user hits the URL, appropriate views will be called.
Set the URL in my_project/urls.py file. Here is the code.
from django.contrib import admin
from django.urls import path, include
from django.contrib.auth import views as auth_views
from prime import views

urlpatterns = [
  path('admin/', admin.site.urls),
  path("login/", views.login, name="login"),
  path("logout/", auth_views.LogoutView.as_view(), name="logout"),
  path('social-auth/', include('social_django.urls', namespace="social")),
  path("", views.home, name="home"),
]
Now you have to set all the required paths for user authentication. The social auth module has the following variable defined.
Open my_project/settings.py file and set these URL variables.
Add the below lines of code at the end of the setting file.
LOGIN_URL = 'login'
LOGIN_REDIRECT_URL = 'home'
LOGOUT_URL = 'logout'
LOGOUT_REDIRECT_URL = 'login'
Wow! Your job is done.
Let’s see how it works.
Start the project using runserver command.
python manage.py runserver
Opne URL in browser tab.
http://localhost:8000/
It will redirect you to the login page. which looks like this.
Your job is not yet complete. If you click on any of these buttons to log in, the login feature does not work.
You have to authenticate and connect your social media with the Django app.
This is the final step in Django social login with the Facebook tutorial.
Login to your Facebook account in the browser and then open a developer account.
Here is the URL for the Facebook developer account.
https://developers.facebook.com/apps
Add a New App.Display Name and Contact Email for the new app.Create App ID.Go to setting > basics. And set the App Domains as localhost.
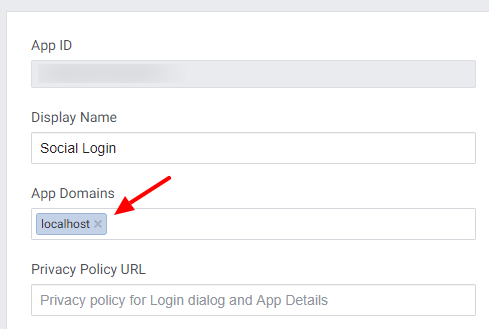
Scroll till the end. You will find the option to set up the website. Add the localhost URL in the website field as below.
http://localhost:8000/

Save the changes.
Copy app ID and secret key. And set those values in social_app/settings.py as below.
SOCIAL_AUTH_FACEBOOK_KEY = YOUR_APP_KRY # App ID
SOCIAL_AUTH_FACEBOOK_SECRET = YOUR_APP_SECRET # App Secret
Update the Facebook login link in login.html.
<button class="btn btn-primary mb-2">
<a href="{% url 'social:begin' 'facebook' %}">Login with Facebook</a>
</button>Now start the web server with the below command.
python manage.py runserver
Visit the login page in the browser using the localhost URL.
localhost:8000/login
It will look like this in the browser.
Click on Log with Facebook and follow the steps.
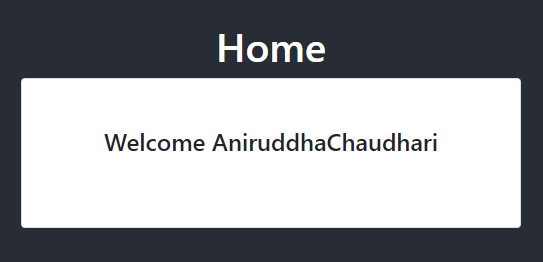
After login, you will be redirected to the home page.
You can see the username read from the Facebook profile on the screen.
Here, I log in using my personal Facebook account.
Awesome!
You have to set the parameters you want to read from Facebook.
Open setting.py and add the following setting.
SOCIAL_AUTH_FACEBOOK_SCOPE = ['email', 'user_link']
SOCIAL_AUTH_FACEBOOK_PROFILE_EXTRA_PARAMS = {
  'fields': 'id, name, email, picture.type(large), link'
}
SOCIAL_AUTH_FACEBOOK_EXTRA_DATA = [
    ('name', 'name'),
    ('email', 'email'),
    ('picture', 'picture'),
    ('link', 'profile_url'),
]
Also, add context_processor to access the data.
TEMPLATES = [
{
'BACKEND': 'django.template.backends.django.DjangoTemplates',
'DIRS': [],
'APP_DIRS': True,
'OPTIONS': {
'context_processors': [
'django.template.context_processors.debug',
'django.template.context_processors.request',
'django.contrib.auth.context_processors.auth',
'django.contrib.messages.context_processors.messages',
'social_django.context_processors.backends', # added
'social_django.context_processors.login_redirect', # added
],
},
},
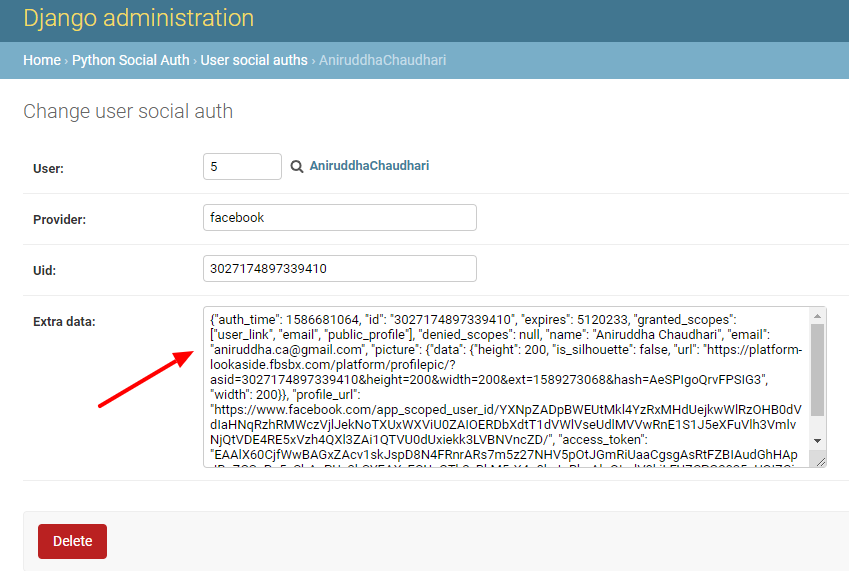
]In the above setting, we are asking the user to provide an email ID, profile picture, name, and the profile link from the Facebook account.
When a user logs in, the admin can see all this information inside the admin panel under the “user social auth” instance as “Extra data”.
Update home.html page to display the user profile on the home page.
<!-- home.html -->

{% extends 'base.html' %}
{% block title %} User Profile {% endblock %}
{% block content %}
<div class="row">
  <div class="col-sm-12 mb-3">
    <h4 class="text-center">Welcome {{ user.username }}</h4>
  </div>

  {% for ass in backends.associated %}
  {% if ass.provider == 'facebook' %}
  <div class="col-md-6 text-center">
    <img src="{{ass.extra_data.picture.data.url}}" alt="" width="150" height="150" style="border-radius: 50%">
  </div>
  <div class="col-md-6 social-container my-2">
    <p> You're Signed in via {{ ass.provider }} </p>
    <p> Your Name:  {{ ass.extra_data.name }} </p>
    <p> Profile URL: <a href="{{ass.extra_data.profile_url}}">link</a></p>
  </div>
  {% endif %}
  {% endfor %}
  <div class="col-sm-12 mt-2 text-center">
    <button class="btn btn-danger">
      <a href="{% url 'logout' %}">Logout</a>
    </button>
  </div>
</div>
{% endblock %}python manage.py runserver
Now visit your localhost home page once again (http://localhost:8000/).
You can see all user details with name, profile picture, and link to the Facebook profile.
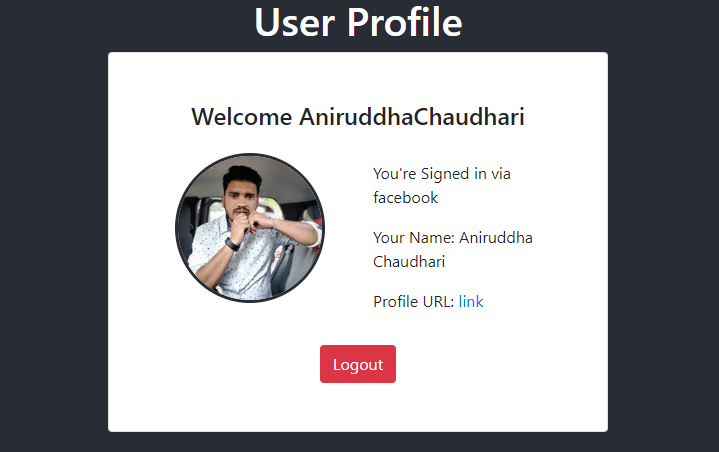
Awesome!
Conclusion
In this tutorial, you have learned to implement social login authentication in Django using social-auth-app-django Python library.
You can add this social login feature in any of your projects where you need to authenticate the user.
This is all about the complete tutorial on Django’s social login with Facebook. If you have any questions or if you are finding it difficult to implement, let me know in the comments.

I am a Python enthusiast who loves Linux and Vim. I hold a Master of Computer Science degree from NIT Trichy and have 10 years of experience in the IT industry, focusing on the Software Development Lifecycle from Requirements Gathering, Design, Development to Deployment. I have worked at IBM, Ericsson, and NetApp, and I share my knowledge on CSEstack.org.
I’m Tamie. I’m learning Django in my school. Thanks for this tutorial.
Thanks for this tutorial. Does it apply for logging in with Google?
You’re welcome, Emperor! Yes, you can implement Google logging similar to the Facebook login demonstrated in the tutorial.
Hi Aniruddha, i’m Gianluca !! I’m starting to study Python and moving with flask/Django. Your tutorial is what I’m seeking, thanks for sharing 🙂
You’re welcome, Gianluca! I’m glad you are getting help from my tutorial. Hope you enjoy going through my other tutorials as well. Best wishes!
I am trying these but not working.
Can you share more details about what’s not working?
Thanks for such a good tutorial. Even tough I have a problem, I have done everything that this amazing tutorial says, but when I click on log in with Facebook I revieve an error which says that I can not get an access token neither log in the app on a non secure webpage, that I should reload the page as an https. I have seek for solutions but I do not find any. Do you have any advice or solution? Even an explanation on why this happens would be super helpful.
Thank you so much in advance.
Hi Pedro, Thanks for your kind words. I’m glad you like this tutorial. Regarding your problem, can you make sure that you have added the proper site URL to the Facebook developer account (Just as mentioned in step 4)? To be on the safer side, you can add a website URL with both HTTP and HTTPS. Also, test with the localhost server.