
When does someone ask me what platform to choose to get excel in programming?
“Linux”. No doubt.
And the best editor?
“Vi/Vim” on Linux systems.
In this tutorial, I will show you how to set highlight syntax in VI editor for programming in your Linux systems. At the end of this post, you will get a clear idea, why and how you should start using Vim editor to get excel in coding.
Table of Content:
Before digging into this tutorial, if you are a programmer, you should know the functionality difference between vi and vim editor.
Vi is a very popular, simple black and white editor in Linux. If you look at the modern editor, Vi lacks on a certain thing. One of such a thing is Syntax Highlighting. Vi editor does not support syntax highlighting. Many of the programmer reports- vi syntax highlighting not working.
Syntax highlighting is one of the primary features to have for any editor. It makes your code more colorful by highlighting specific color as per the context and meaning of a particular line of code. The syntactical text will be shown with some specific color.
Ex. String message will be shown in Red Colour, code comments in blue, programming keywords with green color…
Vim is advance to the VI editor. Vim offers many advanced features over Vi including Syntax highlighting. (I will not be discussing other differences as it is not the scope of this article. I will try to cover those difference in my upcoming article.)
When you look at the highlighting code, it looks more readable. And it sparks immediately what kind of data it is. You can find the glimpse of context behind the line of code.
Vim supports syntax for many of the popular programming languages like Python, C/++, Java… and many other advanced programming languages.
If you are learning programming languages, you can refer following tutorial links.
Vim is the superset of Vi. Basically, whatever feature we have with VI, it comes with Vim editor as well.
So, if you are into programming, move from Vi editor to Vim.
There are certain Linux distributions like Fedora / CentOS / Red Hat (RHEL) doe snot provide enhanced Vim editor. To install on those systems, follow the commands given below.
Note: Other Linux distributions come with preinstalled vim editor. So, you can skip installing vim.
Vi editor comes preinstalled on all the Linux distribution including Ubuntu, Redhat… But, it does not highlight syntax. Syntax highlight function is present in Vim editor.
If Vim editor is not installed on your system, you can install it with the following command.
yum -y install vim-enhanced
To run above command you need your Linux system connected to the internet. If you don’t have an internet connection, you can download vim package from any other connected system. And install it on your system.
Vim editor is advance over simple Vi editor.
Many of us are habitat running command Vi in Linux terminal to open any text file or source program. And by default, it opens Vi editor.
You can open Vim editor by running command vi. You just need to set alias. It is easy doing it in Linux.
To add an alias and to open Vim as vi editor, following the steps those are given below in your Linux.
There are two ways to set alias- globally or only for the specific user in Linux.
Open Linux terminal and run the command.
vi /etc/profile
It will open /etc/profile file. Add a line at the bottom of the file.
alias vi=vim
Save the file.
To make it work, you have to refresh the changes. Run the below command in the terminal.
source /etc/profile
Now all the users on Linux can open Vim editor by running command vi in the terminal.
Suppose I have logged into the user profile named – csestack. To add an alias for only specific to the csestack, you need to make the changes in the .bashrc file.
vi /home/csestack/.bashrc
Add below the line of code at the end of the file.
alias vi=vim
Refresh these changes by running below command.
source /home/tecmint/.bashrc
Now check if the if the alias is set properly. Open any file in vi editors by typing command in the terminal.
vi <file_path>
It will open Vim editor instead of Vi.
You can see the text in the syntax highlighted format rather than simple white text.
That’s all.
You can also turn off the syntax highlighting in Vim editor. Reverse engineering works.
I did not find any solid reason to disable the syntax highlighting in Vim editor. (If you get any reason to use Vim without syntax highlighting, let me know in the comment. 😛 )
Still… Here is the way you can turn the syntax highlighting on/off in VIM editor.
Open any file in Vim editor
vi <file_path>
As we set an alias for Vi, it will open the file in Vim editor. Text in the file will be highlighted with different color.
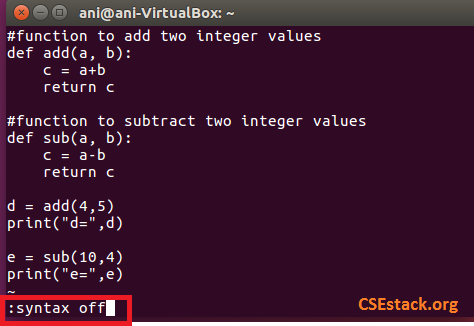
Vim Command for “Syntax Off”
Use the command :syntax off in Vi editor.
In below example, I just wrote simple Python program. You can see all the text in white. There will be no syntax highlighted.
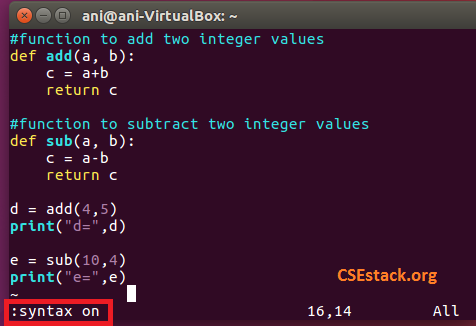
Vim Command for “Syntax On”
Use the command :syntax on in Vi editor. You can see the Python code is highlighted in the editor.
This is all about to highlight syntax in VI editor for programming in Linux. Now, you are ready for your playground. Enjoy the coding.
Related Post: 6 Commands to Edit File in Linux (File Handling with or without Vi editor)
If you find it useful, do share with your friends. And don’t forget to mention why do you love coding in Vi.
In upcoming articles, I will be sharing more vi editor tricks and shortcodes. Stay tuned!

I am a Python enthusiast who loves Linux and Vim. I hold a Master of Computer Science degree from NIT Trichy and have 10 years of experience in the IT industry, focusing on the Software Development Lifecycle from Requirements Gathering, Design, Development to Deployment. I have worked at IBM, Ericsson, and NetApp, and I share my knowledge on CSEstack.org.